

Welcome to Hartwood Farm’s Vegetable Guide—let’s get down to enjoying those veggies!
You can start reading here from the top, or skip down to the sections using the menu below—we are rolling out new crops, pictures, and recipes week by week this winter, so keep checking back as we add fresh ideas on how to add more delicious vegetables into your life.
Sections of the Hartwood Farm Vegetable Guide:
General Produce Storage and Handling Guidelines
An Overview of Cooking Methods for Veggies
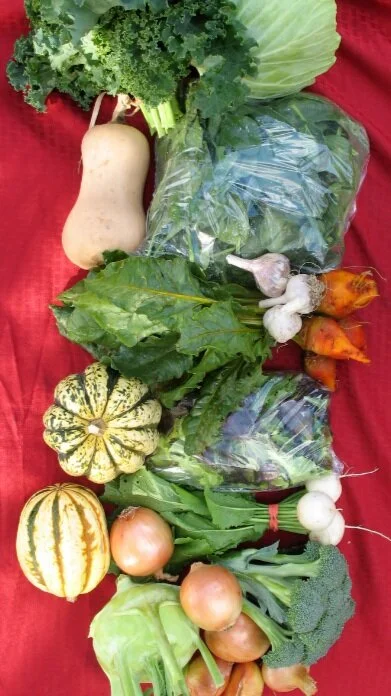
The Veggies: Root Crops
We hope that this guide helps you use your CSA and market veggies well. We are farmers and not chefs, so this is based more on the merger of our experience between the farm and the kitchen, so please feel free to make any suggestions or tell us what does (or didn’t) work in your kitchen. Please too let us know what questions you still have, and how we can help you make using our delicious vegetables more fun and easier.
Thanks so much for your support, and we hope you enjoy the veggies. And now we dig in!
Happy Eating, Maryellen and Matt and everyone at Hartwood Farm

About this Guide
We’ve been growing vegetables in one way or another since 1998 and providing for our CSA and markets here in upstate NY since 2012. These past twenty years have been quite a journey for us as our farm evolves and grows, but also been a bit of a culinary adventure. While we both feel pretty comfortable in the kitchen, we’ve realized over time how overwhelming veggies can feel to prepare, especially when you get busy.
Just like we sometimes feel overwhelmed by the complexities to grow and harvest each of the fifty plus crops and three hundred varieties we raise, we realize that you, our awesome CSA members and market customers, may also feel a bit overwhelmed by all the different methods of handling, preparing, and enjoying this myriad supply of delicious veggies.
The sad (well, sad to us as vegetable farmers) thing is that it’s SO much easier to cook starches and meat and dairy—we totally understand this because we find ourselves at crunch time doing the same thing, and we are even vegetable farmers surrounded by veggie goodness!
Over the years, we’ve really worked on sharing how to use and prepare all the awesome flavors of vegetables we grow. This year we’re taking all those hints and tips of using the veggies and consolidate them into one resource in one place to help you use your share of veggies—this veggie guide!
This guide takes a page to cover almost every veggie we grow on the farm (we are always adding new ones, so there might be a few that aren’t in here yet). It shares how to identify it (with some pictures—we will get more for future editions), when it’s in season, how to handle and prepare it for cooking, and what are some ways to use it, including our favorite preparations. It also includes a cheat sheet of times of how long each preparation method takes, and a sense of how long you can store each crop.
We’ve organized it into the sections we think about our veggies in terms of:
Salad greens—for crops typically enjoyed raw or as part of a salad
Cooking greens—greens that are usually cooked before eating
Root crops—anything growing underground
Fruiting crops—things that are pods or fruits or beans
Weirdo veggies—crops that defy easy classification, think broccoli or cauliflower
Herbs or spicy things—crops that add a lot of flavor to dishes
Number One: Don’t Worry!
One thing we hear from a lot of customers is that folks are worried about spending a lot of money on vegetables and then not using them up or else cooking with them, but then not really enjoying the preparation you went with. Our philosophy on cooking vegetables as two busy people that are okay, but not great cooks, is that less is more. We figure that since we are starting with super fresh, local, and (hopefully!) naturally delicious crops, that we can focus on simple preparations that really let the veggies share their flavor. We focus on cooking methods that are hard to get wrong—basics like sauteing, roasting, or making quick salads.
But honestly, sometimes things don’t go great together, at which point we make notes and try again with something else the next time that vegetable is back in season. You also don’t have to like every vegetable (we try to stock the swap baskets so there are lots of options to trade out), so don’t feel guilty if you realize that you just don’t like something! Personally, I’m not a fan of lettuce, but I’ll fight you for that last rutabaga.
What we mostly want to share is that doing a CSA or eating locally from markets can be fun. Yes, it will take a little more time in the kitchen (but not too much more), but hopefully will pay off in terms of great flavor, interesting new dishes to add to your repertoire, the fun of trying new things, and all those health benefits of eating veggies!


We don’t Recommend Chainsawing Veggies at home :)
General Produce Storage and Handling Guidelines:
Each veggie in this guide will store best under certain conditions, but in general (and when in doubt), 95% of vegetables store best at low temperatures in high humidity. You can create this type of environment by using loosely sealed plastic bags (or some of those reusable fancy vegetable storage bags) combined with the crisper drawer in your fridge. The only catch is that many veggies react poorly to ethylene, which apples release, so don't put apples in the same crisper as your veggies!
While we wash many of the vegetables at the farm to “hydro-cool” them (a fancy way of saying we use super cold water to cool them off super-fast so they last longer), we recommend that you wash everything before you eat it, because veggies are grown out in the ground and can get dirty! In an ideal world where we all had infinite time, you would wash out the vegetables right when you get them home, spin them partially dry in a veggie spinner, before storing them in a loosely closed plastic bag in an apple free crisper drawer.
In the real world, this might not always happen. You will want to get the veggies into the fridge right away, and make sure that they are in a plastic or storage bag so they don’t desiccate in the fridge. When you are ready to use them, it’s actually often best to wash them in mildly cool or lukewarm water as that can help refresh them more than cold water.
(We also are fans of “cooler cleaner” recipes—simple meals that can help us easily use up all of the veggies that are reaching the end of their life before the next round shows up! These go-to meals for us include vegetable soup, crock pot dishes and soups, casseroles, quiche and frittatas, and mega-salads!)
An Overview of Cooking Methods for Veggies
One last thing we wanted to cover are the methods of cooking that we find easiest for vegetables. This isn’t an all-inclusive list, but rather the preparation methods we turn to most often. It’s also not a veggie specific list—you can mix in meats and grains and all sorts of other stuff with all these preparations!
Raw—chances are, when you think of eating vegetables, a bit salad comes to mind first. And yes, tons of vegetables are best raw. One thing we’ve really liked with the whole “bowl” concept that is popular now is that so many different veggies are not being eaten raw, not just the same old salad crops (lettuce, spinach, or radishes) you might initially think of.
Stir-Frying or Sauteing—this is our go-to method of preparing vegetables in a hurry. It’s essentially putting oil in a pan on the stove-top and then adding vegetables in the order of what takes longest to cook down to the fastest cooking items.
Baking (or Roasting or Grilling)—while there’s a bit of nuance between these cooking preparations, we find that tossing lightly oiled veggies in the oven (or on the grill) is a simple way of enjoying the sweet flavor of each crop. One word of warning, while these are some of the easiest ways to prepare vegetables and take no time during the hour of cooking, there can be a bit of labor in all the cleaning and peeling and preparing of the ingredients.
Steaming—this might be the easiest way to prepare vegetables and is arguably the healthiest as it uses a lot less oil than sauteing or baking. Steaming is also one of the quickest ways to cook vegetables! Our only warning is to watch how quickly they cook! Our crops are super fresh and often much more tender than grocery store vegetables so they cook A LOT faster in a steamer, like sometimes in only a minute or two!
Boiling—we rarely boil vegetables aside from potatoes or things we plan on mashing, though we know it’s a favorite cooking method for many others. We feel that our veggies might be too tender to boil, so if you use this method, check them often to not overcook!
Microwaving—I don’t have a lot of microwave experience but am starting to realize that we might be under-utilizing this preparation method, based on member feedback. We are hearing of more and more folks using the microwave to partially cook veggies that take ages, and then finish off cooking them with more traditional methods (so far we’ve heard of this with winter squash, potatoes, rutabaga, and beets). Let us know if you have any experience on this front that we can share!

Root Crops
Beets, Regular and Golden
ID Guide: Deeply purple-red roots (you all know what these look like!). They should be intensely sweet. Golden beets are gold (you guessed that) inside, much sweeter and milder, and don't bleed when cooked! We also grow some heirloom Chioggia beets that have a pretty bulls-eye pattern inside (these ones taste the best raw!).
When it's in Season at Hartwood Farm: Year round—beets are one of the longest season crops, growing in all weather, and able to store for up months! The first baby ones generally arrive in June or July.
How to Handle and Store: In the fridge in a closed plastic bag. They can last up to 8 months with proper humidity levels! Like all root veggies, beets store longest when not attached to their greens. If you want to eat the greens (which you can prepare like chard), we recommend cutting them off of the roots and storing the two in separate bags.
How to Prep for Use: Peel (if storage varieties, fresh or baby varieties are fine just scrubbed off using a veggie brush), and chop or grate as your recipe calls for. Smaller pieces cook faster. Alternately, if you are roasting whole, skip the peeling--after roasting the skins will slip off the beets on their own.
Ways to Prepare: Any way from raw to baking, boiling, sauteing, roasting, etc. Beets are definitely intensely flavored—our recommendation for beet newbies is to chop and roast them (this greatly mellows the flavor while enhancing their sweetness). Many members like to roast them whole (often pierced and wrapped in foil) and then refrigerating, using slices over the week for salads.
If you want to diversify from roasting them for salads, the Kitchn has a great recipe for poaching them
For more of a main dish approach, have you tried “Red Flannel Hash?” It’s a New England dish that traditionally is a hearty breakfast made with leftover corned beef tossed with beets (or beet greens) and potatoes. For a vegetarian, more dinner-y take on it, I like this Eating Well recipe.
It’s not the healthiest preparation, but I do like my beet fries sometimes… Taste of Home mixes them with sweet potato fries.
Quick and Dirty Hangry Farmer Go-To Preparations: We are huge fans of roasted beets--we chop them into medium size pieces, toss with salt, herbs, and oil, and roast at 400-ish for 45 to 60 minutes (until crisping on the outside and tender inside). We also grate them into salads (especially good with carrots) and are fans of chocolate beet cake (bizarrely good, can't taste the beets at all!)
Typical time to:
Steam—30 to 40 minutes, depending on size
Saute—10 to 30 minutes, depending on recipe and size
Bake—35 to 75 minutes, depending on size
Boil—25 to 60 minutes, depending on size (our least favorite way to prepare)

Carrots

Carrots so sweet, the dogs will even eat them!
ID Guide: You know what these look like! We mostly grow orange carrots, but do grow some rainbow red and yellow ones for later in the season
When it's in Season at Hartwood Farm: Mid-July into the winter, first carrots tend to be super small and tender, getting bigger and sweeter as the season rolls along. Carrots can store into April, with the best varieties getting sweeter in the heart of winter.
How to Handle and Store: In the fridge in a closed plastic bag. They can last up to 8 months with proper humidity levels! Like all root veggies, carrots store best if you remove their tops first. (If you don’t they keep trying to grow, and the top sucks all the crunchiness out of the roots).
How to Prep for Use: We usually don't peel carrots until late in the winter--our carrot skins are so tender since they are picked fresh. Just remove the stems and scrub over with a veggie brush
Ways to Prepare: Can be prepared anyway you can imagine--carrots are so versatile that they can fit into almost any dish! One of the most common questions we get is how to use the carrot tops… the answer is that you can use them (we know of folks using them in stock, in soups, or to make a pesto), but we don’t (I’m mildly allergic to parsnips and carrots are in the same plant family and are my favorite vegetable, but their tops just smell like parsnip to me!)
Don’t forget the carrot cake (it’s our favorite, we even had it at our wedding). I love the traditional Joy of Cooking version, but the kitchn version is super moist.
It’s easy to overlook (or eat them all before you get home) how good carrots can be in soup. Here’s a hearty and interesting take on carrot soup by Smitten Kitchen, but we also really like adding a few carrots to be the base of many of our winter soups and sauces (right after the onions).
Quick and Dirty Hangry Farmer Go-To Preparations: We eat a lot of raw carrots dipped in hummus or peanut butter or shredded over sandwiches and salads, but also love adding them to everything we cook. Our favorite preparation is roasting them, either in chunks in a pot roast, around a chicken, or with other root crops, or when baby, sliced in half and roasted in oil, salt, and pepper
Typical time to:
Steam—3 to 10 minutes (we like 'em crunchy)
Saute—3 to 10 minutes, or until the softness you prefer
Bake—20 to 25 minutes if small, up to 50 minutes if larger
Boil—5 to 10 minutes (as a guess, we rarely boil them!)
Garlic
ID Guide: White bulbs (some are reddish too)
When it's in Season at Hartwood Farm: July into winter, July and August fresh garlic is juicier and with a brighter, sharper flavor. We took a few years off from garlic at the farm, but are planting it again this fall, hooray!
How to Handle and Store: On the counter--garlic is harvested in July and hung to dry until October, so no rush to use it quickly. You can leave it on your counter or in the fridge and it lasts months
How to Prep for Use: Break apart the head into cloves and peel off the outer layer of the cloves
Ways to Prepare: Anyway! Garlic is the base for many recipes.
Quick and Dirty Hangry Farmer Go-To Preparations: We add it early into cooking for sautes and stir fries, but also love it roasted as a spread or mixed into dips and hummuses
Typical time to:
Steam—Not recommended unless you love it
Saute—1 to 10 minutes
Bake—25 to 50 minutes, or until soft
Boil—Nope!

Here’s an oldie: Maryellen with her first big garlic harvest back in 2004 or so!
Hakurai Salad Turnips
the hakurai are the white dudes in the middle…
ID Guide: A white bunched root with radish-looking leaves. These are sweet to spicy-sweet roots that are actually turnips, but handled and used more like radishes. If you have a white root veggie in your box, these are it!
When it's in Season at Hartwood Farm: This Japanese root veggies is available Spring and Fall, usually 1 week at each time it will find its way into your box, but we do have them more on demand or at market, since they’ve been getting so popular
How to Handle and Store: Best if you chop off the greens and store the roots separated, bagged in the crisper.
How to Prep for Use: Wash off any dirt, dry on dish towel, and then chop coarsely or finely, as dish calls for
Ways to Prepare: These are great raw in salads, but can also be cooked or roasted in any turnip recipes. They are much sweeter than your average turnip and cook more quickly. We generally don’t eat the tops, but you can—they need to be cooked as like all turnip greens, they are a bit fuzzy.
These are really sweet and mild, giving you the feel of eating a radish, but none of the bite. We have a lot of kids as customers for them since they can be so sweet!. Some ideas for enjoying include:
For a main dish idea, try this Eating Well fritatta. You can also sub broccoli or greens for the raab called for in it, you just might have to adjust your greens cooking time accordingly (less for greens than called for, or longer for broccoli).
Here’s a few great ideas from the Kitchn (and an ode of appreciation ) to help kickstart some recipes!
In general, these guys pair well with flavors like miso and sesame, as well as seasonal veggie buddies like scallions.
And for the adventurous wanting to use the whole plant, Nourished Simply has a nice twist on a side dish for tops and roots!
Quick and Dirty Hangry Farmer Go-To Preparations: 90% of the time we use them sliced raw into salads, on sandwiches, or used for dipping into dressing or hummus. Sometimes we toss them into a saute or mix of roasted vegetables
Typical time to:
Steam—2 to 10 minutes, depending on how you like them
Saute—2 to 10 minutes, depending on how you like them
Bake—In the 20 to 30 minute range, depending on dish and size
Boil—We don't recommend
Leeks
ID Guide: Leeks are members of the onion family that look like long, extra fat scallions, or green onions. We generally distribute them in a bunch, with the top part of the leaves cut off.
When it's in Season at Hartwood Farm: Early summer (after scallions but before onions) the first batch ripens, with the second planting ripening from early fall into winter—these are one of the crops we can harvest even after snow starts to fall!
How to Handle and Store: Leeks store best loosely wrapped in plastic bags in the refrigerator or crisper drawers
How to Prep for Use: Leeks grow in tightly packed layers of leaves, but not so enclosed as an onion, which means that grit can get between the layers of the leek, so you need to take an extra minute to wash them out. The usable part of the leek is the white base that is down near the roots. We also use a bit of the green stem, but only where it’s still tightly wrapped and tender. As you move further up the green part of the stalk, the leaves become tougher—you can still use them for things like stock but can also just compost them.
We recommend that you cut off the root end of the leek and any green leafy tops that you aren’t going to use, and then slice them the long way, before washing carefully between the layers under running water. Alternately, some folks cut the leeks in half along the stem, chop them and then wash the tiny slices well in water.
Ways to Prepare: Leeks are pretty versatile, with a milder, butterier flavor than their cousins the onions. Classic leek recipes include potato leek soup but they can also be substituted into many dishes in lieu of onions, and are excellent as a base for soup. They cook a lot faster than onions, which can speed cooking time, but also cause burning!
For a heartier dish, I really like leeks in pilafs and risottos (here’s a nice version of risotto from Nourished Simply). My only change is that I like LOTS of veggies in my risotto and would toss a whole bunch of leeks in, not just one (and I wonder why my recipes sometimes don’t quite work…)
There’s a lot of amazing potato leek soup recipes out there that are nice and creamy, but sometimes I want a more flexible soup, and this Eating Well take is exactly that (you can alter it based on what veggies you have).
They also have a nice take on one of the more classic ways to prepare leeks—braising. I don’t usually braise leeks, but they are really great that way—nice and creamy…
Quick and Dirty Hangry Farmer Go-To Preparations: Honestly, we are guilty of interchangeably using leeks and onions for almost everything, depending on what is in the cooler when we are cooking! Matt appreciates leeks for being more mild on his eyes and stomach, and I love their creamy, buttery texture when used as a base for dishes. We generally just toss them in to saute ten minutes before we add the next (faster cooking) ingredients.
Typical time to:
Steam—8 to 15 minutes (we don’t prefer this way)
Saute—5 to 15 minutes, stirring regularly
Bake—We don't recommend, but you can grill or broil
Boil—We don't recommend, unless in soup

Onions

even toads enjoy our onions!
ID Guide: You know what they look like! In additional to “normal” onions, we grow a few heirlooms with odd shapes (like the Red Tropea).
When it's in Season at Hartwood Farm: Late July into winter. We start harvesting “fresh” onions in July and August, and these early varieties are usually a bit sweeter than standard storage varieties. Come September, we harvest our storage onions, which can last until June (but are a bit more potent for cutting!)
How to Handle and Store: They can store in either the fridge or at room temperature. Summer onions (up into mid-September) are best in the fridge, while storage onions can handle cool or room temperature conditions. After February, storage onions should go in the fridge or they might start trying to grow!
How to Prep for Use: Chop off the ends and remove the outermost layer. They can then be cut to the dimensions your recipe calls for.
Onions have a bad rap for causing tears, and our NY onions can sometimes live up to that (we tend to have high sulfur soils here, and sulfur is both what keeps our onions storing great all winter, and makes you cry). Chilled onions cause less tears, and our summer onions (the large white Ailsa Craig variety, and the long Italian torpedo varieties) tend towards semi-sweetness. They aren’t quite a Vidalia, but hopefully you shed few tears with them!
Ways to Prepare: Very versatile, onions are the base of many recipes. You can eat them raw, but most folks prefer them sauteed, baked, or grilled.
If you find yourself not using a whole giant onion at one time, I like Budget Bytes easy take on pickling the leftover onion to enjoy later.
Once ever two years I go all out and make French Onion Soup (I like the kitchn recipe). I love it, but it is a bit of a process!
Easier is to caramelize a whole big batch on onions and then have them to add to dishes or soups or salads all week. I have had luck the traditional way on the stovetop as well as in the oven, but really dig the Pioneer Woman’s slow cooker method, which takes a long time, but less work on us!
Quick and Dirty Hangry Farmer Go-To Preparations: We often grill or bake them in halves, but we also use them as a base for a lot of dishes--we start off sauteing them until soft and browned.
Typical time to:
Steam—Not recommended
Saute—10 to 15 minutes
Bake—30 to 60 minutes
Boil—Not recommended
Potatoes
ID Guide: You know what these look like, though we are growing some weirdly colored and shaped ones this year!
When it's in Season at Hartwood Farm: August into winter
How to Handle and Store: Best stored in the dark to keep from turning green, ideally at 50 degrees, but okay in the fridge or at room temperature
How to Prep for Use: We scrub off any dirt and cut off any weird spots, but don't generally peel them until late in the winter.
Ways to Prepare: They can then be cut to the dimensions your dish calls for Can be prepared any way you imagine, but can't be eaten raw!
For more of a meal, we love potato bars. If we have big potatoes, we bake them, but if we just have smaller potatoes, we boil them and fill the bottom of the bowl with them, and then load them up with whatever else is in the fridge—bacon, steamed broccoli, cheese, sour cream, herbs, spicy beans or other leftovers, the list goes on, and it’s easy if you have a group with food allergies.
If you want to take it up a notch, I’m a fan of twice baked potatoes, and loved getting new ideas for them from the Pioneer Woman.
I also love playing with the Spanish Potato Tortilla—it’s essentially a frittata with potatoes, but this Smitten Kitchen mid-summer version is extra tasty.
Quick and Dirty Hangry Farmer Go-To Preparations: We like quick roasted potatoes (tossed with oil and baked at 400 for 40-ish minutes), smashed or mashed potatoes, and roasting potatoes in a dish under a roasting chicken.
Typical time to:
Steam—10 to 30 minutes, until soft
Saute—10 to 30 minutes, until soft
Bake—35 to 50 minutes
Boil—10 to 30 minutes, until soft

Potatoes are the only veggie we let the puppers help harvest!

it may not be fancy, but my favorite sandwich is toast with fresh butter, sliced radishes, and salt and pepper!
Radishes
ID Guide: Round, small red roots, generally distributed in small bunches with greens attached
When it's in Season at Hartwood Farm: Spring and fall into winter. Later in the season we grow “watermelon” radishes that are larger and milder, and this year we are trying out some daikons for the fall!
How to Handle and Store: If you don't plan on eating the greens, radishes store best with the greens removed, in a loose plastic bag. With greens, they last 3 to 5 days. Without greens, they last 2 weeks
How to Prep for Use: Scrub them a little bit and then cut to preferred size
Ways to Prepare: Mostly eaten raw, but I've had them deliciously pickled and roasted (with a range of creamy dressings) before!
Here’s an Eating Well take on roasting radishes—my only changes are that I prefer kale strongly to radish greens, and that I will cut the roots in half to cook faster.
A lot of the root crops are really great fits for rice, grain, ramen, or poke bowls (a new trend that I must confess to loving). We toss radishes on a lot of bowl themed meals or sautes for some spice and crunch, but Simply Nigella has a nice, simple radish version here.
Quick and Dirty Hangry Farmer Go-To Preparations: My favorite meal is radish sandwiches (I know it sounds weird, I only got hooked after being next to a French baker for years at the farmers market). Take a nice slice of bread (toasted is best), lather it with an inappropriate amount of butter, and top with thinly sliced radishes! Also great with a layer of arugula... We also love grated radishes on tacos or as a slaw ingredient.
Typical time to:
Steam—We don't recommend
Saute—2 to 15 minutes, recipe depending
Bake—20 to 30 minutes, recipe depending
Boil—We don't recommend
Rutabaga
ID Guide: Rutabaga are the mongo roots that find their way into your share at the end of the year, they are creamy yellow on the inside with purple shoulders at the top.
When it's in Season at Hartwood Farm: Late fall and though the winter
How to Handle and Store: Best stored in the fridge in a bag, can keep for months into the winter. Unlike grocery store rutabaga, ours is not waxed, so while we do peel it, it’s a lot easier.
How to Prep for Use: We usually scrub and then peel them, rinsing off any dirt at the end. We then chop them down to size based on preparation—either half inch up to 2 inch chunks. You don’t have to use a whole one at one time, just cut off what you are using and store the rest well wrapped up so it doesn’t dry out.
Ways to Prepare: Rutabaga is another underappreciated vegetable—it has this amazing buttery flavor that blends well both on its own with simple butter and herbs and with potatoes and other root crops.
This “root vegetable candy” recipe from Pioneer Woman is my favorite way to eat rutabaga (we sometimes do it all rutabaga). I can sit down and eat a whole pan of this.
Here’s an Eating Well recipe that explains how we do a mixed potato-’baga mash.
Quick and Dirty Hangry Farmer Go-To Preparations: We love roasted rutabaga chunks, tossed with butter, salt, and pepper. We also use it in a 1:3 ratio with potatoes for mashing—the rutabaga adds a light nutty flavor (and is healthier). It’s honestly my favorite roasted root veggie, and I’m always sad when we run out.
Typical time to:
Steam—unknown, never tried
Saute—10 to 30 minutes, depending on size of pieces
Bake—(Roasted) 30 to 60 minutes
Boil—20 to 30 minutes (not as good unless using to mash them, which is great

Scallions

A little kohlrabi-scallion fritter action…
ID Guide: Bunched mini bulb-less onions, they are distributed in bundles. They can be differentiated from leeks by having softer, hollow stems.
When it's in Season at Hartwood Farm: Almost all season, but mostly in the spring—we have been trying some milder varieties that are a lot more flavorful and popular.
How to Handle and Store: Loosely wrapped in a bag in your fridge. They can last several weeks, but do start to look sad after awhile (they are still edible, especially the lower white stem, even when sad)
How to Prep for Use: Cut off roots and rinse lightly (I pull apart the leaves a bit to try to rinse out any dirt that might be caught in there). I usually chop them in two since I prepare the lower white stems and the upper green stems differently.
Ways to Prepare: You can use scallions, especially the lower white parts, as you would onions, except with a lot shorter cook time. Their flavor is much more delicate as well (no crying!). The top greener, more leafy part I usually use fresh or as a raw garnish, which is especially good on top of rice based dishes. They are also great in soups (tossed in at the end)
For a heartier, more meal-y take on scallion pancakes, try Smitten Kitchen’s “potato, scallion, and kale cakes” (yum).
This is another main course take on scallions—Budget Bytes Parsley, Scallion, Hummus Pasta (and I always cheat with store-bought hummus, sorry!).
Budget Bytes also has some great takes on two things scallions really excel at—being baked into savory breads, or imparting their zing of flavor to spreads.
Quick and Dirty Hangry Farmer Go-To Preparations: We rarely cook scallions on their own, preferring their flavor in dishes (we love them in almost anything!). We use them as onions, toss the white stems into sauteed dishes and use the greens as garnish. Our past employee Delaney got us hooked on her favorite scallion pancake dish! You can grill them as well (oil and season first!)
Typical time to:
Steam—Very short, haven't tried
Saute—5 or 10 minutes for white stems, less than a minute for greens
Bake—Haven't tried, but I think they might work (handle like on the grill)
Boil—Nope!